The Blog Fixer

  • About
  • Fixes
    • All Services
    • Image Optimization
    • NoFollow
    • Internal Redirect Fix
    • Link Target
    • Image Alt Tool
    • Swap Affiliate Programs
    • Remove All Amazon Links
    • Custom Fixes
    • Live Fix
  • Contact Us
  • Blog
  • Login
  • Cart

Dec 15 2025

FastPixel Review: Real PageSpeed Results on a WordPress Blog

laptop showing page speed gauge increasing

This post contains affiliate links. I earn a commission if you purchase through them, at no extra cost to you.

If you’ve been following The Blog Fixer for a while, you know I’ve generally preached minimalism and skepticism toward “magic speed fixes.” I’ve told many of you that your Google PageSpeed score does not matter.

Then I tested a plugin called FastPixel that boosted my wife’s mobile scores from the 50s into the 90s. I was ready to write a glowing review and tell everyone to install it immediately.

Then I dug deeper. And what I found is more useful than any plugin recommendation.

The test that changed my mind (and then changed it back)

Katie’s site, Kitchen Stewardship, is full of recipe posts loaded with images. Her mobile PageSpeed scores had been sitting in the orange and red for months. I’d basically given up trying to fix them manually. That’s right, she has a software developer husband who owns a blog fixing site, and she wasn’t getting good scores. Oh the humanity!

woman angry with a slow computer

So when the team at FastPixel asked if I’d test their caching plugin, I figured why not. I installed it, ran dozens of before-and-after tests, and the results were dramatic. Pages that were taking 7 to 13 seconds to load on mobile? Down to under 2 seconds. Mobile scores jumped 34 to 44 points. Katie’s recipe posts went from “Poor” well into the 80s and 90s.

I was sold. I started writing this review.

Then I learned something that stopped me in my tracks.

The number Google actually cares about (it’s not your PageSpeed score)

Here’s what most bloggers don’t know, and what I’m embarrassed to admit I’d glossed over myself: Google does not use your PageSpeed Insights score for rankings.

When you run a test on PageSpeed Insights, it runs a simulation. It creates a fake phone with a throttled connection and loads your page in a virtual environment. That’s your “lab score.” It’s useful for identifying specific problems, but it’s not what Google uses to rank your site.

What Google actually uses is called CrUX (Chrome User Experience Report). This is data collected from real Chrome users who visit your site. Real phones, real connections, real load times. Google gathers this data and uses it to determine whether your site passes or fails Core Web Vitals.

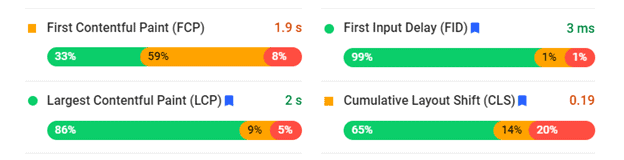
Your CrUX data is public. You can see it right in PageSpeed Insights, in the “field data” section at the top of your results (if enough people visit your site for Google to have data). It looks like this:

crux data found on Page Speed Insights for KitchenStewardship.com

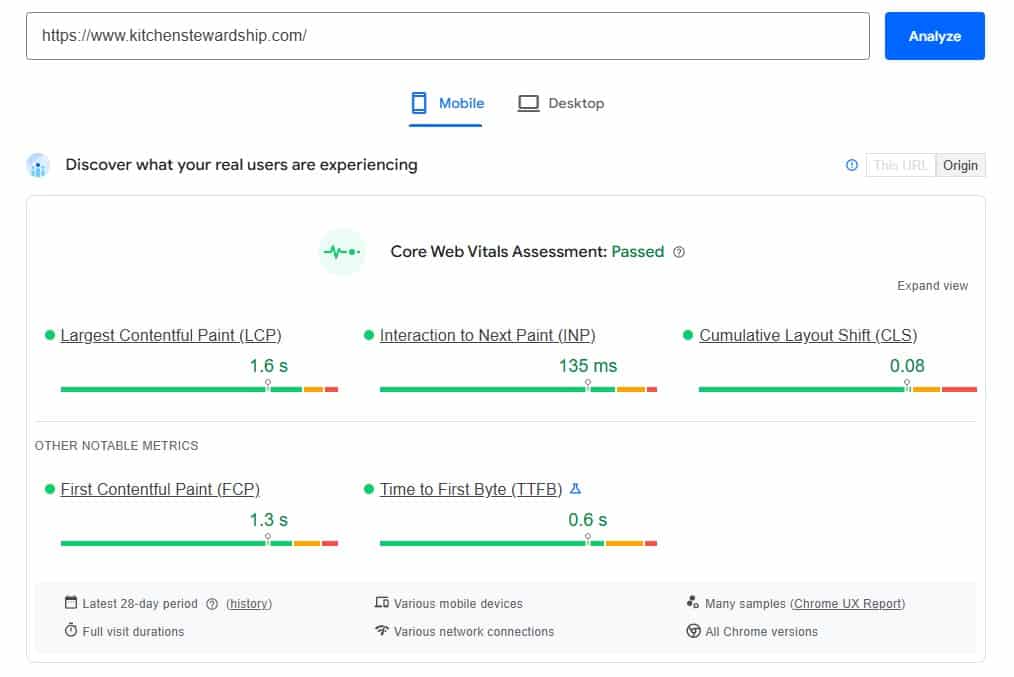
That “field data” section is what matters for rankings. The big score number below it? That’s the lab simulation. It’s useful for diagnostics, but it doesn’t directly affect where you show up in Google.

What I found when I checked the real numbers

After weeks of celebrating those 80s and 90s, I finally checked Kitchen Stewardship’s CrUX data.

Every single metric was already rated “Good.” Before FastPixel.

Real users loading Katie’s site on their phones were already getting fast load times. The 75th percentile LCP (how long until the main content appears) was 1.6 seconds. Google’s threshold for “Good” is 2.5 seconds. Katie’s site was passing with room to spare, and had been the whole time.

FastPixel took the lab score from the 50s to the 90s. That looked amazing. But the real-world data that Google uses for rankings? It said “fast” before I ever installed anything.

So what was going on?

Why the lab score and real-world speed can be so different

Kitchen Stewardship is hosted on BigScoots, which includes enterprise-level Cloudflare caching as part of their performance setup. Every page is cached at Cloudflare’s edge servers around the world. When a real person in Ohio loads Katie’s recipe post, they’re getting it from a Cloudflare server nearby, not from the origin server.

The PageSpeed lab test doesn’t benefit from this the same way real users do. The lab simulation runs in a controlled environment with artificial throttling. It penalizes things like third-party ad scripts, unoptimized CSS delivery, and JavaScript execution time. These are real issues, but they affect a simulated slow phone much more than they affect your actual readers on their actual devices.

FastPixel’s optimizations (inlining critical CSS, deferring JavaScript, serving images through their CDN) made the lab simulation much happier. But real users were already getting fast pages thanks to BigScoots’ caching infrastructure.

The lab score improvements weren’t translating into real-world gains because the real world was already fast.

And here’s the catch: you can’t just run both and get the best of both worlds. FastPixel and BigScoots’ enterprise caching fight each other. Pages fail to cache, CSS gets stripped, layouts break. To get FastPixel working properly, I had to ask BigScoots to turn off their caching entirely. When I did that back in November, the lab scores looked great, but BigScoots support later told me the CrUX data (the real-world numbers) actually got worse during that period. I was watching the wrong scoreboard while the one that mattered was going the wrong direction.

So does your PageSpeed score matter or not?

Here’s where I’ve landed after all this testing.

Your PageSpeed lab score is a diagnostic tool, not a report card. Use it to find specific problems (giant uncompressed images, render-blocking scripts, layout shift issues). Don’t chase the number itself.

Your CrUX field data is what actually matters for rankings. If your field data shows “Good” across Core Web Vitals, you’re fine. Google is happy. Your readers are happy. A lab score of 55 doesn’t change that.

If your CrUX data shows problems, that’s when to act. If real users are experiencing slow loads or layout shift, those are genuine issues affecting both your rankings and your readers’ experience. That’s when a tool like FastPixel, or better hosting, or script cleanup will actually make a difference.

When FastPixel actually makes sense

I want to be fair to FastPixel because the plugin does real work. It converts images to WebP, serves them through a CDN, inlines critical CSS, defers render-blocking JavaScript, and handles lazy loading. These are legitimate optimizations.

You’ll likely see real-world benefits if:

  • Your hosting doesn’t include enterprise caching. If you’re on shared hosting or a managed host without Cloudflare Enterprise or a similar edge caching setup, FastPixel’s CDN and optimization pipeline could genuinely speed things up for real users, not just lab tests.
  • Your CrUX data shows “Needs Improvement” or “Poor.” If real users are experiencing slow loads, FastPixel addresses the most common causes.
  • You have a lot of images and no optimization in place. The automatic WebP conversion and CDN delivery is the easiest way to handle image-heavy sites without touching each image manually.

You probably don’t need it if:

  • Your CrUX data already shows “Good.” Check your field data first. If real-world performance is already fast, you’d be paying to improve a lab score that doesn’t affect your rankings.
  • Your host already provides enterprise-level caching. BigScoots, Rocket.net, and some other managed hosts include performance features that overlap with what FastPixel does. Running both can actually cause conflicts.

What FastPixel won’t fix (no matter what)

Even on sites where FastPixel helps, it can’t touch everything.

  • Ad script bloat. If you run Raptive, Mediavine, or any major ad network, their scripts inject JavaScript that FastPixel can’t optimize. On Katie’s site, Raptive loads 54KB of non-deferrable JavaScript before any content renders. That’s a structural cost of running ads, and no caching plugin can fix it.
  • Plugin bloat. If LearnDash is loading course CSS on your recipe posts, or you have two versions of the same plugin active, FastPixel will cache those problems faster but they’re still problems.
  • Hosting-level conflicts. If your host has its own caching layer (like BigScoots Boost), you may need to disable one or the other. This isn’t always straightforward and can require back-and-forth with support teams.
  • Google Discover eligibility. To qualify for Google Discover, your images need to be at least 1200 pixels wide. Google crawls your raw HTML, not the CDN-optimized version that FastPixel serves to browsers. So if your posts point to a 300-pixel cropped image in the actual content, that’s what Google sees, regardless of what FastPixel delivers to your readers. Fixing that requires changing the actual image references in your posts, not just optimizing how they’re delivered.

man relaxed sitting at a laptop

How to check your own site right now

Before you install anything or spend any money, do this:

  1. Go to pagespeed.web.dev
  2. Enter your homepage URL and run the test
  3. Look at the top section labeled “Discover what your real users are experiencing” or “Field Data.” If it says “This URL has sufficient real-world speed data,” you’ll see your actual CrUX metrics.
  4. If all metrics show green (“Good”), your real-world speed is fine. The big score number below doesn’t matter as much as you think.
  5. If any metrics show orange or red, those are genuine problems worth fixing. That’s where FastPixel or similar tools earn their money.

If your site doesn’t have enough traffic for CrUX data, you’ll see a message saying so. In that case, the lab score is all you have to go on, and improving it with a tool like FastPixel is a reasonable bet.

Where I ended up

I removed FastPixel from Kitchen Stewardship.

Not because it’s a bad plugin. It does real optimization work. But on a site with BigScoots’ enterprise Cloudflare setup, FastPixel created more problems than it solved. The two caching systems conflicted with each other constantly, requiring back-and-forth with both support teams. At one point FastPixel’s optimizer couldn’t even access our pages because Cloudflare’s security was blocking it. And when it did cache pages, it occasionally stripped critical CSS that broke the homepage layout.

Meanwhile, the number that actually matters for Google rankings (the CrUX field data) showed “Good” across every metric the entire time, regardless of whether FastPixel was on or off. Real users were getting pages in 1.3 to 1.6 seconds on mobile. Google was happy. Our readers were happy. The only thing that changed was the lab score, and as we’ve covered, that’s a simulation.

The lab score without FastPixel? 42 on the homepage. Ugly. But the real-world performance? Every CrUX metric rated FAST. Those two things can be true at the same time, and now you know which one Google cares about.

FastPixel is still running on The Blog Fixer, though, and I’m keeping it there. The Blog Fixer is on a standard BigScoots plan without the enterprise Cloudflare caching that Kitchen Stewardship has. There’s no page caching layer underneath, and the site doesn’t get enough traffic for Google to have CrUX data at all. The lab score is the only signal I have, and without FastPixel it sits in the 40s with a 6.7-second LCP. With FastPixel, it jumps to the 70s and 80s. On a site like that, where there’s no enterprise caching doing the heavy lifting and no CrUX safety net, FastPixel is doing all the work, and it shows.

That’s the real takeaway. Whether FastPixel is worth it depends entirely on what’s already running underneath. If your host provides enterprise-level caching and your CrUX data says “Good,” you probably don’t need it. If you’re on standard hosting without those layers, FastPixel can be the difference between a fast site and a slow one. Check your data first. I spent a full day learning that the hard way.

And if you suspect your images have deeper problems beyond delivery speed (missing alt text, broken Amazon product images, files hosted on external servers), a Blog Fixer Site Scan can identify exactly what needs attention. It’s $50, and that gets credited toward whatever fix you need.

Questions? Hit me in the comments. This one got complicated, and I’m happy to talk through what I found.

Written by Kris Kimball · Categorized: Tools · Tagged: Core Web Vitals, FastPixel, page speed, WordPress plugins

Jan 24 2022

Full Site Editing and WordPress 5.9

Screenshot of Appearance menu from Wordpress

WordPress 5.9 is scheduled to come out tomorrow, January 25th. It is chock-full of new features and improvements, but one looms over all the rest: Full Site Editing (FSE).

What is Full Site Editing?

Basically, FSE is the ability to use blocks (like those you might use right now with Gutenberg) throughout your whole site. You are no longer limited to pages and posts, but you can change your header, footer, 404 error page, etc. All of this WITHOUT USING ANY CODE.

You no longer need to go to a developer every time you need to update a logo or change a font. This is really big.

Learn better via video? Here’s one from Astra!

How do I get Full Site Editing?

In order to use FSE you need to have a block theme. These are specific themes designed to allow you to change things with blocks. Currently there are not many of these out there, but we expect that more will be developed soon. WordPress’s new default theme, Twenty Twenty-Two, is a block theme.

Kinsta has a good deep-dive into this new theme and how you can customize it. For a quick overview, keep reading!

How do I use Full Site Editing?

Once you have updated to WordPress 5.9 and have a block theme activated, it is a simple as going to Appearance -> Editor. (It is in beta now, since the official update has not yet arrived.

Screenshot of Appearance menu from WordPress

From here, you will be brought to the Editor from your home page. The similarities to editing pages with Gutenberg are certainly apparent.

Home page with block options

From there, the possibilities are nearly endless. Think that the featured image for your clog post is too big on the home page? Go ahead and change it. Want to add a logo? No problem.

In fact, in a few short minutes, I was able to change the size of the picture, add social media buttons, and add a quote.

Homepage with social media icons

You can add menus and post dates, change colors and font, and even manipulate your columns.

And I didn’t need any HTML.

Should I get a block theme immediately?

For most people – no. While these features could be really cool down the line, they are still in their first version. If you have a theme that you love and is working for you, there is no need to switch just to switch. If you are planning a redesign soon, though, it may be worth looking into a block theme. That way, as things improve and grow you’ll be able to take full advantage.

Are there other changes in WordPress 5.9?

There are, although most of the noteworthy ones are around FSE and blocks. The block editor in general is getting some improvements too, so you can take advantage of that even if you aren’t using FSE right now.

Where we are now?

FSE looks like it has great potential as it matures in the future, but it doesn’t mean it is more awesome than what you already have. Keep it in mind for the future.

As things update and develop, we’ll keep you in the know! Check back for more information.

Written by Danielle Hetzel · Categorized: Uncategorized

May 02 2021

How Can I Increase the Speed of My WordPress Site if I Don’t Speak Tech?

Man speeding through code sitting on a computer mouse

Man speeding through code sitting on a computer mouse

Clients bring this problem to me more than any other, so I know it’s a real problem. And for good reason!

Site speed is super important for a good reader experience and even comes into play in Google’s algorithm that determines site rankings. When a reader clicks on one of your links, you want that page loaded before something else shiny catches their eye – like that next cat video on YouTube.

Having personally logged in to the dashboards of thousands of sites to apply our services, I can tell you speed is a legitimate concern. It’s not only aggravating readers on the front end, but many bloggers are putting up with slogging through an incredibly slow editing experience that is costing them valuable time.

You’re probably already doing the simple recommendations (like “use a caching plugin!”), BUT if you try some of the others, often many hours invested will only improve your site speed about 1% and potentially cause functionality on your site to break. ☹

Let’s uncover 4+ easy solutions that actually work to speed up your WordPress blogs. First however, we need to dispel some of the myths.

Myth 1: Google PageSpeed Insights is Always Correct When It Says Your Site is Slow

Clients often email in a panic bemoaning their “terrible” site speed and waving around their PageSpeed Insights grade to prove it – “If I’m not cool with my kids bringing home a D, there’s no way this F is going to fly on my site…”

Often, we find out their actual speed numbers aren’t that bad.

The grade you get from that or any other tool should be taken with a grain of salt. It is absolutely possible to have a fast site and still get a bad grade.

In fact, if your site uses an ad network, it’s virtually impossible to get a good grade from most of these tools (more below).

There are many starting points or metrics to measure your site’s speed:

  •         How long does your site take to send the very first piece of information to the browser?
  •         When does the above the fold content appear?
  •         How long before the reader first interacts with your page?
  •         At what point is everything 100% loaded?

Google has before stated they would put the most emphasis on… well, none of them. Now they have announced their push for Core Web Vitals, but we still don’t know how they are going to factor in with everything else.

I would argue the best metric is the feel test. Quite simply, does your page feel slow to you when you visit? Does it feel like you’re waiting longer than you’d like?

Today’s SEO is all about making your readers happy. If it feels slow to you, it will to your readers as well – and Google will notice that.

If so, it’s time to work on making it faster, and your PageSpeed Insights score is just one of the many tools you can use to help in that endeavor.

Just don’t let the total score dictate your efforts.

A Note About Ads

Let’s address the ads elephant in the room.

Ads introduce 3rd party scripts and images to your site that you have no control over. If you run an ad network, here are some of the pieces of your score you will only be able to change by reducing the total number of ads that appear on your site (exact names will vary depending on the tool you’re using):

  •         Reduce DNS lookups
  •         Make fewer HTTP requests
  •         Compress components
  •         Use cookie-free domains
  •         Add Expires headers

I don’t recommend ditching a major source of income, but keep this fact tucked away in your mind: Every time you want to freak out because your site got a failing grade on a site speed analysis (and you really don’t settle for anything less than an “A” in real life), you need to breathe and accept the consequences ads have on your site speed.

Myth 2: Reducing Your Number of Plugins Will Speed Up Your Site

This one is always a popular tip from the gurus!

To be fair, in a sense it’s true. Every plugin loaded will take some time. Most often that time is not something you’ll notice when doing your feel test.

One site can be screaming fast with 100 well-written, lightweight plugins, while another site might be crawling along because of just one poorly written plugin.

Many of my clients ask about The Blog Fixer: “Will it slow down my site?”

No, it won’t – because our plugin doesn’t run on every load of the page. Other plugins do and depending on what they are doing can consume some of your server’s precious resources every time a reader goes to a post.

The point is, not all plugins are equal when it comes to affecting the performance of a site. Removing plugins that provide great functionality with the sole goal of increasing site speed most often results in …the loss of great functionality. Not exactly a win-win.

Now, if you have a plugin on your site you’re not using, by all means remove it. If you don’t gain anything on the performance side, it’s still a good idea for site security.

But instead of just blindly throwing away plugins you’re using, I would recommend checking lists like this one that describe popular plugins known to slow things down while also suggesting faster alternatives.

Real Solution #1: Upgrade your Host

Now that those myths are out of the way, let’s talk about what you can do to truly move the (speed) needle.

If you use a shared server on one of the big “budget” hosts and think your site feels slow, I guarantee you’d benefit from upgrading your host.

Over the course of servicing 3,500 sites on about 100 different hosts, I’ve experienced both the good and the bad. Consistently, sites on those well-known budget hosts are the ones that crawl along (and often run into the occasional 500 error due to a lack of resources).

While there are several good hosts to choose from, I’ve found sites on one particular host stand out as running the fastest – and that’s BigScoots.

The first time I ran into a site hosted by BigScoots, it was easily the fastest I’d ever dealt with. I immediately emailed the owner to find out who she hosted with and moved all my own sites over.

What kind of speed difference can a host make?

As I mentioned, I’ve personally logged into thousands of WordPress dashboards and can always tell a good host from bad. To understand the difference, think about browsing over dial-up vs. broadband (if you’re old enough to remember modems).

I wanted to be able to talk hard numbers instead of just antiquated analogies, so I decided to set up an experiment.

At The Blog Fixer, we use our plugin to scan all posts and pages of a site to determine problems that need to be fixed – we call this our Site Scan. We search for about 20 different issues, and on sites with a large number of posts, that search can take some time. (We’ve worked with sites as large as 90,000 posts!)

I tested speed differences between 3 different hosting plans: A “budget” shared host, BigScoots’ entry level shared plan, and BigScoots’ fully managed plan. I set up identical test sites and ran through our Site Scan on each, recording the time it took to finish. Testing like this on the backend is a good measure of how fast the server itself is.

The conclusion?

The “budget” host’s shared server was the big loser: BigScoots’ entry level plan was 140% faster, and their fully managed plan a whopping 400% faster.

That kind of change is going to move the needle far faster than poking away at tiny details for a half percent lift (or none at all). And the kicker? That least expensive plan at BigScoots only costs $3 more than the “budget” plan.

Action item: Choose a fast host! Changing hosts isn’t as big of a deal as it used to be. This is your foundation, and it’s worth doing before making any other “site speed” efforts.

Real Solution #2: Upgrade PHP

The next solution to act upon is upgrading your PHP version. I know what you’re thinking: “I’m not techy!!” Stay with me, it’s easy, I promise.

PHP is the programming language that powers the WordPress software behind the scenes. Just like WordPress, it has its own version numbers and is most often installed and maintained by your hosting company.

WordPress has always strived to maintain backwards compatibility, which means the minimum required version of PHP was 5.2 for many years. This version was released waaay back in 2006 and stopped being supported in January 2011.

That’s right, you could still run WordPress on top of software the predates the release of the first iPhone and was abandoned about 2 months after Instagram went public.

It’s rare that I find sites still running on top of PHP 5.2 these days, but listen: any version prior to 7 is really considered ‘ancient’ in terms of software. (Think “flip phone.”)

There are many great security reasons to make sure your site is running on at least version 7, but the most pertinent to this discussion is that version 7 can come with as much as twice the performance as anything in version 5. (Using the same site scan experiment above, I was seeing a performance increase of 140% after upgrading PHP on my “budget” shared server.)

Recent WordPress versions have begun displaying warnings on the dashboard if you have an old PHP version – pay attention to this!

Most hosts will display the PHP version your site is running on somewhere within your hosting dashboard. If you can’t find it, ask their support. (Ahem, it’s their job…)

 If your PHP version is anything less than 7, it’s time to upgrade – graduate from a flip phone to a smart phone. 

Action item: Open a ticket with your hosting provider,  and ask to be upgraded and have them check compatibility with your plugins. At this point, only very outdated ones are likely to cause a problem.

Boom – faster site.

Real Solution #3: Reduce Your Redirects

Redirects are almost always a necessary part of a site that’s been around a bit. If you started on HTTP and then moved to HTTPS, changed your permalink structure, or combined multiple posts into one, you’ve created redirects to make sure your readers end up in the right places.

This is good for SEO at first — however, what you might not realize is that redirects can slow down your site speed. One test found that it can be as much as 50%.

This is especially important to your mobile traffic, where internet speeds (and thus redirects) are even slower.

What’s more, often redirects get chained together, meaning the reader must go through multiple redirects after just one click, each part of the chain adding to the wait time. Instead of going from point A to point D (the destination URL), they might have to go from A to B to C to D.

For some links, this can’t be helped. You still want other sites that link to an old spot on your site to send readers to the right place.

However, all internal links on your site which you do have control over should be updated to go straight to the destination URL.

This process isn’t hard, but it is very tedious. You’ll want to update links in your sidebar, menus, and (most time-consuming) inside the content of your articles themselves.

What this looks like step by step:

  •         The sidebar and menus are a quick half hour task most likely – just open each link and make sure that what you click on is the exact same URL as you end up on and edit any that are different. Your goal is to make the end URL what’s actually in the html code.
  •         Now you need to open all your posts (yes, starting at the beginning).
  •         You can either click on each link and watch for redirects or go to the text editor and do a visual scan.
  •         You’re looking for URLs still starting with http:// or containing dates that you’ve since removed (for example:  https://yoursite.com/2011/06/28/google-plus-will-put-facebook-out-of-business).
  •         Change these links to the final URL that doesn’t go through any redirects.

But Kris, you’re saying, I don’t like your advice anymore. This will take hours…days…maybe years if I still feed my children and sleep every night!

Any time a blogger feels like she needs to touch every post, it’s incredibly time consuming. That’s exactly why I created The Blog Fixer — to help my wife, who was constantly begging me to help her make mass changes on every post (like when Google first instituted nofollow).

The first “Fix” we ran on her blog changed 21,000 affiliate links to nofollow in just a few minutes.

For a huge time-saving shortcut on eliminating redirects, check out The Blog Fixer’s Redirect service.

Here at The Blog Fixer, we help bloggers automate the little tasks they loathe so they can get back to doing the parts they love (remember writing and interacting with readers, before Google and Amazon started changing everything with so many rules?).

We optimize your archives through white-glove services powered by our custom plugin, and to save bloggers precious time everything is installed and configured by our team.

What this looks like step by step:

  •         Purchase the service.
  •         Send my team a user on your WordPress blog.
  •         We’ll run the service and eliminate redirects on every internal link on your blog.

It takes about 5 minutes, 5-and-a-half if you need to watch my video on how to make a new user in WP, or can’t remember where your business credit card is.

Action item: Edit all redirected internal links on your blog to hit the final target. You can do this DIY or with The Blog Fixer’s help.

Real Solution #4: Optimize Your Image Size

Cameras on phones these days are awesome. I took many breathtaking images during a hiking trip in Yosemite Valley. Like a proper Gen Xer, I uploaded 17 per day to Facebook.

Family and friends were amazed that they could see the individual mist droplets rising from waterfalls. All of that beauty means more and more bytes stuffed into each image file.

And, as you probably understand by now, every one of those extra bytes increases the load time of your post. If you haven’t paid close attention to pixels and bytes in each photo on your blog, you’ve got yourself a great place for optimization.

Multiply slow by the number of images in a post, and your readers have forgotten why they clicked to read your post because they noticed grass starting to grow while they were waiting for it to load.

Like redirects, this is even more important to your mobile traffic.

There are a variety of services out there that “smush” images, but the easiest solution I’ve found is ShortPixel. Their WordPress plugin is pretty much plug-and-play, and they have a bulk fix feature, which can fix all your existing images when coupled with one of their reasonably priced one-time plans.

What this looks like step by step:

  •         Install the ShortPixel plugin.
  •         Run their Bulk Optimization Tool – it will tell you the number of images it can optimize.
  •         Purchase a one-time plan for the number of images you found in the last step.
  •         Paste your key into the plugin.
  •         Return to the Bulk Optimization Tool and kick it off.

Note: This may take a long time to run, sometimes even days, and you need to leave the tab open while it’s going. I recommend kicking it off on a Friday and letting it go all weekend while you enjoy family time. Check in every so often to make sure it hasn’t hit a glitch and needs you to press the button to start it off again. Oh and remember that hosting recommendation I made a few thousand words ago? Do that first. Slow hosts make this process as painful as a cross-country road trip with a teething toddler.

Once that’s done, you can grab a subscription for as low as $5/month to automatically optimize all images you upload in the future.

Action item: Install ShortPixel, purchase a one-time plan, and run it on your blog. It’s a game changer.

The Bottom Line on Site Speed for Bloggers

There’s always going to be more you can do to eke out every last bit of performance on your site.

However, it makes the most sense to use your time and money wisely by starting with the biggest “bang-for-your-buck” foundations, since there’s often a steep drop-off in your ROI when you tinker with optimizations beyond these.

Prioritize these first –get a great host, make sure they use the correct PHP version, ditch your redirects (I’m here to help), and optimize those images.

Then, go spend time with the family making memories (which you will solemnly swear to smush before publishing to your blog!) instead of fretting about every last detail in your PageSpeed Insights score.

May the site speed be with you, and may your blog end up faster than a toddler gets distrac…hey look, a new cat video…

Written by Danielle Hetzel · Categorized: Uncategorized

Apr 13 2021

Google Core Web Vitals – LCP, FIP, CLS

Google's Core Web Vitals, What do they mean for Bloggers? From The Blog Fixer

Reading about Google’s Core Web Vitals feels a little like looking at a bowl of alphabet soup – LCP, FIP, CLS, AMP, UX… It all starts to run together. It’s easy to get lost before you’ve even started digesting.

In this guide our goal is to translate all of the acronyms into Blogger-speak. We want you to be able to communicate with your tech team, or even to do what you can on your own. But to do that, first everyone needs to be speaking the same language.

Core Web Vitals as Ranking Signals

In November 2020, Google announced that the Core Web Vitals they have defined will become ranking signals in May 2021. (This got delayed to mid-June 2021 as of April 19.) We don’t know exactly what this will look like yet, but it does mean that sites with good Core Web Vitals stats will, somehow, receive some kind of positive signaling in searches. Whether this is something visual for end-users or just something behind the scenes remains to be seen.

Google uses a number of other things as ranking signals, such as whether a page is mobile-friendly, if the page is on HTTPS, etc. This is going to be added on top of these other things.

Jumbled alphabet soup

Defining Core Web Vitals

There are three Core Web Vitals that Google has defined: Largest Contentful Paint (LCP), First Input Delay (FID), and Cumulative Layout Shift (CLS). They have also been calling them “Page Experience Signals,” which gives you an idea that they’re looking for a site that’s enjoyable, or at least not difficult, to use.

Largest Contentful Paint (LCP) / Loading

This vital is probably the most familiar to people. It measures how long it takes for a page’s main content to load. It is an aspect to page speed, a metric bloggers have been using for a long time. However, this specifically looks at the largest image or content block on the screen. Things “below the fold” do not factor in, nor does every separate item on the screen. Additionally, some elements such as video are not included in the measure.

A good LCP score is 2.5 seconds or below.

First Input Delay (FID)/Interactivity

First Input Delay measures how quickly a visitor can interact with your website. In other words, once someone clicks on something or interacts in any other way, how long does it takes for your website to respond. Can they expand menus, fill out forms, or scroll through images quickly?

A good FID score is less than 100 milliseconds.

Cumulative Layout Shift (CLS)/Visual Stability

Cumulative Layout Shift is a measure of how much things move around on the page while it is loading. We’ve all had an experience where we go to click something on a website and accidently hit the wrong thing because something else on the page loaded and everything got moved down. You want to avoid this, as it creates a frustrating user experience. Pages should be stable quickly.

CLS is not measured in time, but in how much things move around on the page. A good CLS score is under 0.1.

Finding Core Web Vitals Scores

The standard Google recommendation for looking at your Core Web Vitals seems to be Google Search Console. On the right-hand menu, there is an option called “Core Web Vitals” under Enhancements.

Screenshot of Search COnsole menu with Core Web Vitals highlighted under Enhancements

This report will tell you how many of your URLs are poor, need improvement, or good on Core Web Vitals. However, to really get the information we were looking for we had to use PageSpeed Insights.

Here you can enter in individual URLs (your landing page, pages that you are most concerned about showing up with high results on searches, etc) and get their Core Web Vital scores. You can look at Mobile vs Desktop, individual scores, opportunities for improvement, etc.

For example, when we look at the Desktop score for our services page, we receive an overall “Good” score.

Core Web Vitals score of 95

Below the overall score, we can see the scores for the three individual Core Web Vitals, plus a fourth metric “First Contentful Paint (FCP).”

Scores of: 1.9 s for FCP, 3 ms for FID, 2 s for LCP, and .19 for CLS

Note that we received a “Good” overall score even though some of the individual metrics weren’t in the “good” range.

These numbers are based on real-world data. Below these you’ll find more scores that are based on their lab results. These will very often be different, since in the real-world people have different internet speeds, bandwidth, etc.

Google just came out with a new Page Experience report. Look for more information about this report in the future!

Improving Core Web Vitals

PageSpeed Insights also lists some Opportunities and Diagnostics that you can use to try to improve you Core Web Vital scores. None of them is a guarantee to put you in the green, but they may give you a clue as to what is happening if things are red.

The Opportunities are definitely written in tech.

Opportunity labeled "Eliminate render-blocking resources"

We’re not going to through each individual suggestion here, but we can give some general advice for each of the Core Web Vitals.

A quick note before you take all of these suggestions as must-dos. A lot of the recommendations have trade-offs. Something that makes your page look great might slow it down a bit. Something that gets readers to “stick” and keep browsing might also shift things around. As with everything, you have to decide what is the more important thing for your site.

Improving LCP

Since LCP is an element of page speed, the suggestions may feel familiar. In fact, our biggest suggestion is one we’ve mentioned again and again: get a fast host. We are affiliates with BigScoots and get money if you sign up through us, but we would recommend them even if we didn’t. We can tell when we’re working on a site with a good host (or more accurately, we can tell when it is a bad host…), and they’re one of the best.

An easy one that you can do is to compress and optimize your images. There are a lot of plugins out there that can handle it automatically, or you can do it before you upload the image.

It is also a good idea to eliminate scripts and styling that you no longer need. If you’re looking for an excuse to clean up your site from old code, this is definitely it. We also recommend caching your website if you don’t already.

Lazy Loading can be a mixed bag. It helps overall page speed, but could actually slow down your website as it is another script to run. It is best used if your LCP is not an image.

Improving FID

Most of the suggestions for improving FID are very technical. You want to break up JavaScript code into smaller chunks that can run asychronously. You want to optimize your CSS. Determine if your third-party code is actually necessary and then remove it if it isn’t, or delay it if you can.

Basically, try to streamline everything possible. If you don’t need something, get rid of it. Think sleek.

Improving CLS

Content often shifts around on a page when the dimensions are not already pre-determined, since the page doesn’t know where things will end up. Make sure your images, ads, embeds, etc have dimensions set. And everything that can be preloaded (like web based fonts), should be.

Bad CLS scores are often a result of ads. AdThrive came out with a fix earlier this month, so if you use them make sure to read up on it and update their plugin. Mediavine also has an article about CLS and their ads, including a new setting.

Beyond that, the suggestions are similar to what is best for the other Core Web Vitals. Get rid of unnecessary code.

How Good is Good Enough?

Ultimately, this is going to be different for every website, even for every page within a site. Since this is affecting Google rankings, it is most important for those pages where you are getting significant traffic from Google searches as opposed to social media, email, etc. Also, it is most likely more important for highly-contested search terms. If there are a lot of options out there, Google will (from what we can tell), give preference to those with good Core Vital score. Think of it as a tie-breaker. If you already have the corner on a certain search, that may not be where you want to put your energy, at least right now.

Core Web Vitals and The Blog Fixer

If you’re looking to speed up your site, our Internal Permalink Redirect Fix can help by eliminating redirects that slow down your server.

If you have any other specific things you have in mind that we could help with, give us a shout! We’d love to hear how we can help.

Written by Danielle Hetzel · Categorized: Uncategorized

Mar 02 2021

WordPress 5.7 Update – jQuery, Lazy-load, HTTPS – Oh My!

WordPress 5.7 jQuery HTTPS and More from The Blog Fixer

The WordPress 5.7 release is slated for March 9, 2021.

There are a number of changes that should not need any action on your part: Lazy-loading iframes, color palette standardization, etc. We’re going to focus on two changes that could impact you and how your blog runs: HTTPS detection and migration and jQuery update.

Blue lock icons with one red unlocked lock icon

HTTPS Migration

What is HTTPS?

This is a signal used by browsers such as Chrome and Firefox to determine if your site was being served up securely. Any page that is on HTTP instead of HTTPS, or any page with resources such as an image that is on HTTP will show up as insecure on these browsers.

Why does this update matter?

In the past, it was difficult to migrate a WordPress site from HTTP to HTTPS. Finding and updating each resource was time-consuming and error-prone. Now WordPress users will be able to click a button to update these resources on the fly.

On the fly? What does that mean?

That means that nothing will actually change in the database. WordPress will change it on the front-end whenever someone visits the site.

This is similar to how the Real Simple SSL plugin handles things.

What are the pros and cons of doing it that way?

The pros are that it is easy and inexpensive. The site will display as secure for users without much work on your end.

As for cons, having to make these updates on the fly every time a website is viewed can slow things down. Also, if WordPress ever deprecates this service or it breaks in an update (not that things like that ever happen…), your resources will resort back to HTTP. Finally, if you ever migrated the website away from WordPress then things will break again.

Is there a way to make these changes permanent?

Yes! The Blog Fixer’s Mixed Content Error Fix makes all of the needed changes on your database. It does not depend on a plugin to keep working and the changes will stay even if you migrate to another platform.

JavaScript Code

jQuery Update

What is jQuery?

The technical answer is that jQuery is a JavaScript library. What is important for you to know is that WordPress and a lot of plugins and themes use it behind the scenes.

Why does it matter that it is updating?

WordPress has been compatible with old versions of jQuery for a long time. However, in order to clean things up and get rid of a lot of outdated things, they are going to require a certain version of jQuery. This means that any plugins and themes you have that use an older version of jQuery could no longer going to work.

When is this happening?

It has already started, but slowly. They started laying some of the groundwork in WordPress 5.5. In 5.6, they updated the version of jQuery that they were using. They also put out a plugin called jQuery Migrate that would allow you to still run the apps on the older version of jQuery. With the March 9 release, jQuery Migrate will be removed. Any plugins and themes that are not compatible could stop working.

What should I do?

First, you should update your plugins. If they are being maintained, hopefully they will be all set for the jQuery update.

Also, remember that you don’t have to update on day one. Give it a little bit of time so you can hear how it went for other people.

Before you update, take and download a backup of your site.

After that, the best advice we have seen and that we give ourselves is to set up a testing site. That way you can test the latest version of WordPress there. If anything is not working, you’ll have to communicate with the plugin and theme developers.

How do I make a test site (AKA staging)?

Ideally this would be done easily through your host. (If it isn’t, look into someone like BigScoots [affiliate link]. Yes, we get money if you sign up, but we would refer you to them even if we didn’t.) The basic steps are:

  1. Push site to staging
  2. Upgrade staging to 5.7
  3. Check pages on your site, especially those that use plugins, for issues.
  4. If everything looks good, update the live site.

Here’s a more in-depth description of creating a staging site.

What about The Blog Fixer plugin?

We are all ready for the jQuery update, and have been for a while!

If you have Live Fix, check to see if you have version 0.8.7.1 or higher. Yes? Then you’re good! If not, now is a good time to update.

If you use The Blog Fixer’s functionality to maintain anything else – removing noreferrers, removing comment author links, etc – rest assured that you’re all set no matter what version you have.

Written by Danielle Hetzel · Categorized: Uncategorized

  • 1
  • 2
  • 3
  • 4
  • Next Page »
  • Become an affiliate
  • Privacy Policy
  • Terms and Conditions

© 2026 · KFT Solutions